In this post, I will show you how to protect yourself while connected to an untrusted Wi-Fi access point with your iPhone.
This tip is useful if:
You're travelling a lot and use Wi-Fi along the way
You're using your iPhone in coffee shops, hotels, conference centres, airports, etc
Please note that to take advantage of the app mentioned later on, your iPhone needs to run at least iOS 7.
Problem
Imagine yourself in the lobby of a posh hotel, enjoying an espresso and a delicious muffin.
You're taking out your Apple device, connect to a free Wi-Fi hotspot and check your emails.
Oh, you've received a few messages:
A friend's request on Facebook
Two photos from a friend abroad
Your mobile phone bill (which reminds you to turn roaming off)
You look at the photos, save them to your camera roll, then open up the phone bill (phew, no surprises).
You click on the Facebook link, which opens Safari, you enter your password and voila, you're browsing your friend's profile, commenting on a few posts.
Your massage appointment is approaching so it's time to get back to your room.
50 minutes later, relaxed and happy you're ready to share your experience with your friends.
This is when you discover that somebody else has been posting outrageous comments on your behalf.
You don't understand what happened, then you immediately try to change your password but you can't.
Without realising it, you've actually been hacked by someone who was in control of the "free" access point that you connected to earlier.
As a consequence, that person was able to:
decrypt all your Internet communication
take control of the email account used for Facebook
and change a few of your most important passwords
This is obviously a worst case scenario which, if it happened would lead you to visit https://www.facebook.com/hacked.
Even if you don't have a Facebook account, the content of your email communications could have been intercepted, and your email account could have been compromised.
In the next section, I'll explain how you could have prevented this from happening even when connecting to an untrusted access point.
Solution
The solution is called a VPN, which stands for Virtual Private Network.
A VPN creates an encrypted "tunnel" through which all the Internet traffic is passing.
This tunnel goes straight from your computer to a protected server controlled by the VPN provider. This "exit" server can be located anywhere in the world.
From there, your communications go to the destination servers and come back through the same tunnel.
This means that none of your Internet traffic is visible by the Wi-Fi hotspot owner as well as other people sharing the same Wi-Fi access point.
Among the VPN providers I’ve tested, there is one that I recommend wholeheartedly: TunnelBear.

Courtesy from TunnelBear
With its free monthly plan, you get 500 MB of protected traffic every month, which is enough for email and web browsing.
If you have a twitter account, you can tweet once a month to get an additional 1GB traffic for free.
If you watch videos on YouTube or listen to music via an online service (like Spotify), then you'll most probably need to go with a paid plan.
TunnelBear offers two kinds of paid plans (either via in-app purchases or their Web site):
For iPhone and iPad only (5 maximum)
3,99€ for 1 month
9,99€ for 3 months
29,99€ for 12 months
For up to 5 computers and mobile devices
7,99€ for 1 month
49,99€ for 12 months
A side benefit of VPN tunnelling is that all your traffic now appears to be originating from the country of the TunnelBear VPN server.
Say you chose "United Kingdom" for instance, you would then be able to access content (like BBC iPlayer) without restrictions.
Full disclosure: I love them so much that I signed up for their affiliate program, and thus I will earn a small commission if you decide to start a paid plan using the following link.
Configuration
First, you'll need to install and configure TunnelBear:
View the app in the App Store
Tap on "Get", then "Download" (you may need to enter your Apple password)
When installed, launch TunnelBear
Create an account by providing an email address and a strong password
If you already have an account, tap on "Log in" instead then enter your TunnelBear credentials
A message that TunnelBear needs to install VPN settings will appear
Tap on "I'm Ready"
Tap on "Allow"
Enter your device passcode to finalise the VPN settings installation
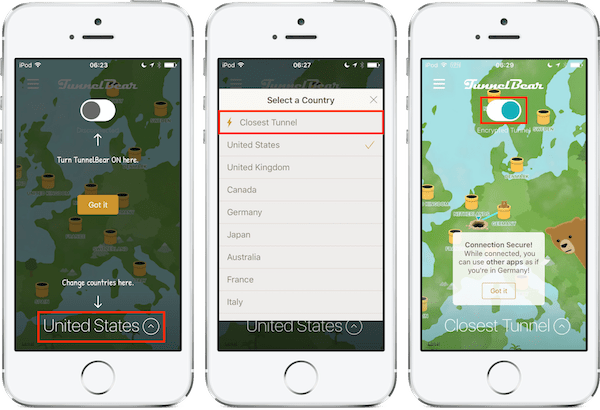
TunnelBear will then open automatically and show you the two main toggles to play with:
At the bottom, select the country where you want your Internet traffic to be tunnelled to
At the top, there is a "On/Off" switch to activate and deactivate the tunnelling
Starting & stopping a VPN session
Whenever you want to start a VPN session:
Launch TunnelBear
Choose the closest tunnel in order to get as much speed as possible (unless you want to appear browsing from a specific country)
Tap the “On/Off” switch

Once the VPN connexion will be established, the app will show you from which country your Internet traffic is routing.
In addition, a small VPN logo will appear in the iPhone status bar and you'll see how much of the 500MB traffic is remaining.
To get an additional 1GB free traffic:
Tap on the 3 horizontal lines (top left corner)
Tap on "Get Free Data"
Tap on "Let's do this!"
Enter the name of Twitter account
Validate the tweet

To stop a VPN session:
Open TunnelBear
Tap on the “On/Off” switch again
The VPN logo in the status bar will disappear.
And you, do you use a VPN when connecting to an untrusted WiFi hotspot? If so, which one do you use?
Please let me know in the comments below!