In this post, I will show you how to block undesirable content in Safari on your iPhone (running iOS 9 or superior).
Motivation
First, let’s explore the reasons for blocking undesirable content while surfing the web.
Reason #1: Privacy
What few people know is that web pages contain hidden and benign scripts whose sole purpose is to track what we do online, whether it is via:
advertisements
social sharing buttons (Facebook, Twitter)
third party analytics companies (Comscore or Google Analytics)
Here is the kind of data that is collected:
your location
the version of your web browser
the version of your operating system
your gender or age (while still logged into one of your social media accounts)
This is why, after searching for Tesla cars in Google, you start noticing either ads or suggested content about Tesla, on websites that you visit subsequently.
Reason #2: Browsing speed
Advertisements and tracking scripts force your web browser to fetch more information that what you're interested in, sometimes up to three times more.
This means that in practice, it can substantially increase the time it takes to display the content of the page.
This is why content blockers can help speed up your browsing experience and reduce the data consumption when you're surfing on your mobile Internet network (3G or 4G).
On mobile devices, content blockers have the added benefit of slightly reducing power consumption and therefore improving battery life.
Reason #3: Security
Even when surfing on a respectable website (like The New York Times or BBC), there is a risk that a hacker injected a potentially dangerous script or that the online ads contain malicious code, also known as “malvertising”.
If those scripts leverage a known yet unpatched or unknown (aka zero day) vulnerability, there is a risk of getting your iPhone compromised.
If you've heard about Jailbraking (the act of removing the software restrictions of iOS), it is only feasible when exploiting security flaws in iPhones, which can been done through Safari.
Compatibility
To be able to install content blockers, your iPhone needs to run at least iOS 9 and must be an iPhone 5S or superior.
What to expect
Before diving into the how-to section of this post, let's review the anatomy of a good content blocker, as well as the potential pitfalls that you might experience.
A good content blocker
Is easily customisable
Displays information about blocked content
Allows you to disable blocking on a site-by-site basis (also called whitelisting)
Most common pitfalls
Some advertisements may still be visible
when they are whitelisted by the content blocker
when third-party ads are replaced by simple images hosted on the main website server
Some portion of the website functionality could be inadvertently disabled:
like the "new mail" button in Yahoo webmail
when trying to purchase a product on some e-commerce sites
Some websites display a banner saying that they detected the usage of a content blocker:
either they don't provide the content
or they ask you to contribute financially
By whitelisting a website, you can restore its functionality and show your support to the site owners, while at the same time reducing your defense against the risk of malvertising.
Another option would be to temporarily disable content blocking and re-enable it as soon as possible, which avoids the need to update the whitelist later on.
Please note that, even though it's technically feasible to have multiple content blockers running at the same time, it also creates challenges, especially when you'd like to whitelist a site
Therefore, if you decide to test multiple options, I'd advise you to enable only one content blocker at a time, unless you have a good reason to do otherwise.
Installation
When iOS 9 was introduced, the fact that it natively integrated content blocking was a big deal.
The developers who released their content blocking app early, seized the opportunity to charge for it, even though the apps were pretty basic.
Nowadays, several hundreds of content blockers are being offered and they fall into one of those pricing tiers:
Free
Paid
Free with in-app purchases
While doing some research, I've tested a sample of apps based on their reputation, popularity and functionalities and here are the two options that I recommend:
If you want something simple, I'd recommend to start with BlockBear.
If you're the kind of person who likes to tweak things, then install 1Blocker to see the customization options that it provides, then you can decide whether paying 2,99€ is justified or not.
The process to activate content blocking on your mobile device is always the same:

If you've installed multiple content blockers, remember to enable only one at a time to avoid surprises.
While surfing the Web with Safari, you can temporarily disable content blocking:
Do a long press on the "Reload page" icon (right side of the address bar)
Select "Reload Without Content Blockers":
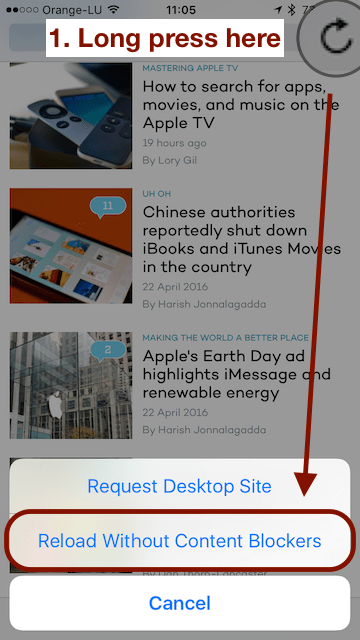
This works only for the current page and until you click on something or reload the page.
If you want to disable content blocking for a particular site, then you'll need to whitelist it.
Here are some instructions on how to make the most of those 2 content blockers:
BlockBear
Pros
Free
Choice of what to block
Easy whitelisting of websites
Cons
Less exhaustive list of blocked content
Non-customizable list of blocked content
By default, BlockBear blocks ads, social buttons and tracking, using curated lists, one for each type of blocking. The only option at your disposal here is to toggle each category ON or OFF.
To make the whitelisting process as easy as it can possibly be, you need to activate (just once) an action extension like this:
Open any webpage in Safari
Tap on the "Share" button (square with an arrow pointing up)
Swipe left to scroll the bottom row of icons (action row) until you can't go further
Tap on the "More" icon (three dots)
Scroll down until you find the "BlockBear Whitelist" option
Toggle on the "BlockBear Whitelist" option
Tap on "Done"

Then you'll be able to whitelist a site that you're currently browsing like this:
Tap on the "Share" button
Locate and tap on the "BlockBear Whitelist" action
Confirm by tapping on the "Add" button

1Blocker
Pros
Easy whitelisting of websites (requires in-app purchase)
Extremely customizable and extensible (requires in-app purchase)
Cons
Allows some ads by default (click here to block them)
Requires a 2,99€ in-app purchase to be fully functional
By default, 1Blocker only allows to activate 1 type of content to be blocked and, unfortunately, whitelisting is not available, unless you upgrade via the in-app purchase.
In the configuration panel of 1Blocker, you'll see all the categories of content that can be blocked, and for each type, the specific rules that can be toggled ON and OFF.
If you can't quite justify to cost of the in-app purchase, you could still use 1Blocker alongside BlockBear.
This would allow you to activate a category of rules than only 1Blocker supports, like:
EU Cookie Notices,
Anti-Adblock messages
Social Media widgets
or even Adult sites.

And you, did you install a content blocker for Safari on your iPhone?
Please let me know in the comments below!